Finishes for Tuck Boxes: Foil, Spot UV, Lamination and Windows
What each finish adds to a folding carton and how to combine them on one box.
By the Tuck Boxes carton desk · Updated
What finishes can a tuck box have?
A finish is anything added after or alongside the print. Some change the feel of the whole carton, such as lamination. Others pick out one area, such as foil on a logo. Every finish below is an option, quoted in writing when you ask for it.
Finishes add cost and a production step, so choose them for a reason. One well-placed highlight usually does more than three competing ones.
- Matt, gloss or soft touch lamination over the printed side.
- Spot UV, a clear raised gloss on chosen areas.
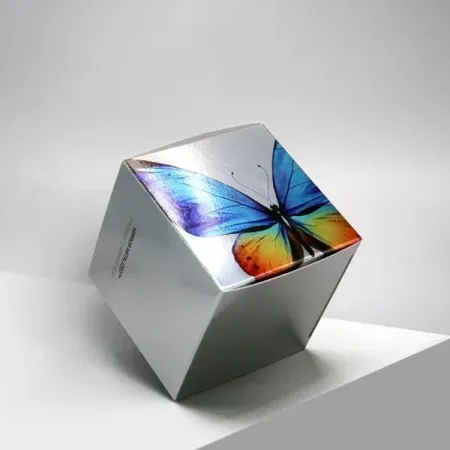
- Gold, silver or holographic foil.
- Embossing, which raises an area, or debossing, which presses it in.
- Die-cut windows, with or without a clear film.
- Hang tabs and thumb notches cut into the carton.
- Card and rise-up inserts inside the box.
Matt, gloss or soft touch: which lamination?
Lamination is a thin film bonded over the printed face. It protects the print from scuffs and helps dark colours resist cracking on the creases. It also changes the look.
Gloss makes colours brighter and more saturated. Matt gives a flat, calm surface that suits minimal designs. Soft touch is a matt film with a velvety feel in the hand, popular on skincare and fragrance cartons.
Lamination stops short of the glue flap, so the side seam bonds to bare board.
Soft touch shows fingerprints a little more than gloss, and dark soft touch cartons can mark when rubbed together. Pack them flat and handle them with dry hands.
Lamination covers the whole printed face, so it is the finish buyers notice first when they pick the box up.
What does spot UV add?
Spot UV is a clear, glossy coating printed only on chosen areas, then cured hard. On a matt or soft touch carton, a glossy logo catches the light while the rest stays flat. The contrast is the whole point.
Spot UV artwork needs to line up with the print beneath it. Allow for a small registration shift, often around 0.5 mm. Very fine lines under about 0.5 mm wide can fill in, so keep shapes simple and bold.
It can also pick out a pattern across the whole carton, such as fine stripes or a repeat of your logo. Seen at an angle, the pattern appears and disappears as the box turns.
How does foil work on a carton?
Foil is pressed onto the board with a heated die. The metallic layer sticks only where the die touches, leaving a bright, mirror-like shape. Gold and silver are the usual choices, with holographic foil for a rainbow effect.
Foil holds detail well, but very thin lines can break. A line weight of around 0.2 to 0.3 mm is a sensible lower limit for most work. Our foil tuck boxes with gold and silver show foil on logos, borders and text.
Foil also works well on kraft board, where gold or black stands out against the brown.
Foil can sit over printed colour or on bare board. Over a dark printed background, gold and silver look especially bright because of the contrast.
When is embossing or debossing worth it?
Embossing pushes an area up from behind so it stands proud of the surface. Debossing presses it down. Both are made with a matched pair of dies and can be combined with foil on the same shape.
The effect shows on the inside of the carton as a dent or bump. Keep embossed shapes about 3 mm or more from creases, so the fold stays clean. Details finer than about 0.5 mm tend to soften, so bold logos emboss best.
Blind embossing, with no ink or foil, gives a quiet tactile logo on plain board. It works well on white or kraft cartons with a simple design.
How do die-cut windows work?
A window is a shape cut out of one panel so the product shows through. You can leave it open, or ask for a clear film glued to the inside of the panel. Film keeps dust off and stops small parts poking out.
Keep a border of at least 5 to 8 mm of board around the window so the frame stays flat. Keep the window 8 to 10 mm away from any crease. Our candle boxes with a window show a front panel cut-out on a jar carton.
Window shapes can be rectangles, circles, arches or a custom outline. Rounded corners of about 2 to 3 mm radius cut more cleanly than sharp inside corners.
Hang tabs, thumb notches and inserts
A hang tab is an extra header panel above the top tuck. It is punched with a hole so the carton hangs on a retail hook. A common hole is a sombrero or round shape about 6 to 8 mm across. See our custom hang tab tuck boxes for examples.
A thumb notch is a small half-moon cut in the top edge of a panel, often about 20 to 25 mm wide. It makes a tight tuck easier to open. Card and rise-up inserts hold the product in place or lift it into view.
A rise-up insert has a folding platform that lifts as the lid opens, so the product rises into view. It works well for droppers, perfume and small gifts.
How do finishes combine on one carton?
Most cartons use one overall finish plus one highlight. The table shows common pairings and what to watch.
Finishes also need to sit in the right place on the dieline. Foil that runs onto a tuck flap hides once the box is closed. Spot UV across a crease can crack.
| Combination | Effect | Keep in mind |
|---|---|---|
| Soft touch plus spot UV | Velvety box with a glossy logo | Keep spot UV shapes bold |
| Matt lamination plus gold foil | Calm surface with a bright highlight | Foil lines around 0.2 mm or heavier |
| Gloss lamination plus window | Bright colour with the product on show | Window clear of creases by 8 to 10 mm |
| Foil plus embossing | Raised metallic logo | Both dies must line up, so keep shapes simple |
| Kraft board plus black or gold foil | Natural look with crisp detail | Pale print colours fade on brown board |
Each extra finish adds a step in production, so ask for each option to be listed separately on the written quote.
How do you choose finishes for your box?
Work through these steps in order. Starting with board and surface keeps the highlight finishes in proportion.
- Pick the board first, since finishes look different on white and kraft.
- Choose one overall surface: matt, gloss or soft touch.
- Pick one area to highlight with foil, spot UV or embossing.
- Decide whether the product should show through a window.
- Add a hang tab only if the carton will hang on a hook.
- Put each finish on its own artwork layer.
- Check every finish position on the free proof before you approve.
Our guide on setting up dielines, bleed and panels covers the file side of finishes in more detail.
Common finish mistakes
Most finish problems are planning problems, not printing ones. These come up again and again on first proofs.
- Adding foil, spot UV and embossing to the same small logo, so none of them reads clearly.
- Setting fine text in spot UV, where it fills in.
- Running lamination over the glue flap.
- Placing a window across a fold line.
- Choosing pale foil on white board where it barely shows.
Not sure which finish suits your carton? List what you are considering on the quote request form, and we price each option.